Tuesday, August 15, 2017

S/V CarolMarie in the CV! - The Chula Vista Marina

Two months in the Chula Vista Marina.....

Before coming down from Portland we did a little research (we actually means Charing did it and I took credit as the captain.) . The Chula Vista Marina seemed to be the best place to moor from a cost and services point of view.

First there is Mike Sullivan the harbor master who keeps a great eye on the marina, seems easy going, and professional.  There is a reason for it too, with 552 slips to look after.  The marina was opened in 1984.  Most of the staff has been there a long time.  


CV Marina

The marina and RV park is separated by Chula Vista Bayside Park.  The separation park is basically a walkway to the park which terminates at south bay.  On the south side of the park is a fishing pier, and on the north side a large walking park with picnic areas.  The parks walkway is alway full of people strolling, running, and walking their dogs.  From the cockpit of the CarolMarie we have a great view of the fishing pier.

Looking back at the pier at sunset


Both the marina and the RV park are fenced and gated with locked gates.  Security patrols from the marina staff patrol the docks at night.

The concrete docks designed in upwind/downwind configuration, with single berth configurations each with a dock box, water, and power.  Every four or five slips is a trash can fixed to the dock, so you don't have to haul the trash all the way to the dumpster. There are free boater education classes every weekend in the boater lounge.  The restrooms are very clean, and nice showers.  There is a pool and hot tub as well.  The laundry room has a row of washers and dryers which always seem to be unused when I pass by.

One of the best parts about the marina is the Boater Concierge Service.  Although this sounds expensive it's not and very much worth the price.  The service offer a once a month boat cleaning above the waterline, a once a month bottom cleaning, and a pump-out service.  Although the slip fees is on par with California prices, the service isn't.  I get the service for the price of what I paid to just have a diver clean the bottom.  The boat has never been cleaner on the outside.

Pump out guy - aka the Pump Out King comes to your boat for $10.00 if you don't have the concierge service.  His dog Shaddy usually lies on bow of his service boat as he does his business.
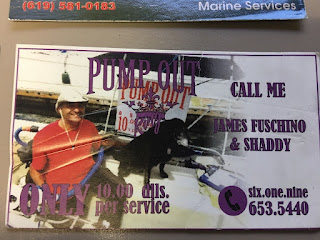
Pump Out King

What's unique here is the payment method for the Pump Out King.  The preferred protocol is to run out to life lines, clip on the fee (and a tip for Shaddy), then text the POK your marina, your slip number, and your boat name.  Sometime in the few hours to the next day, you'll find your tank is clean, and the fee is collected.

Fee for the Pump Out King
The marina has a restaurant/bar onsite called the "Galley".  The Galley opens at 8am for breakfast, serves, lunch and dinner, then offers drinks and usually a live band at night.

Soup and Salad at the Galley
A couple of weeks after sailing down from Portland I caught a bad case of pneumonia.  Rather then staying at the apartment by myself I recovered at the marina.  The week and a half it took to recover went by fast, in part due to the great service from the Galley.  The bartender was awesome when I couldn't even speak, and brought out bowls of soup.

Every weekend I journey down to the CV to spend the weekend on her.  With the help of Charing's Uncle Keni we've done a few major projects.

Nearly every weekend boaters gather on the docks; camping chairs out to watch the sunset.  Afterwards we sit around, have a few drinks and debate the finer points of cruising.

On August 5th (8-5) was the "Five O'Clock Somewhere" Party - lasting from 5-8.  (get the numbers theme?) . Mike through a great party, with a band, free beer, and BBQ sandwiches.

Party at the marina
The CV Marina is a wonderful place.  If you come to Southern California there is no better place to stay.


Thursday, August 3, 2017

Oh That Smell - Replacing the holding tank

After our trip down the coast we had entered into warmer weather, and with warmer weather the cabin began to take on an unpleasant smell.  I had traced the smell back to holding tank which due to poor design was directly beneath the pullman berth where I slept.  After taking all the bedding apart noticed the tank was leaking from around the flanges, hoses, and small cracks on the bottom of the tank.

The first step was to label all the hose and then figure out how all this works.

Hoses all labeled
Once I labeled all the components of the sanitation system, I created a diagram of the system to ensure I would get the right parts, and know how it all works later.

Diagram of the sanitation system.

To show the damage to the holding tank you can see the evidence in the photo below.

Leakage down the hoses
I removed the tank and then spent a good amount of time with bleach, soap, and rags cleaning this area of the bilge.  On the HC 38MKII this area of the boat is isolated from the bilge to create a water tight compartment.  This compartment holds the holding tank, the forward diesel tank, the inlet strainer for the head, through holes for the heads inlet and outlet.  

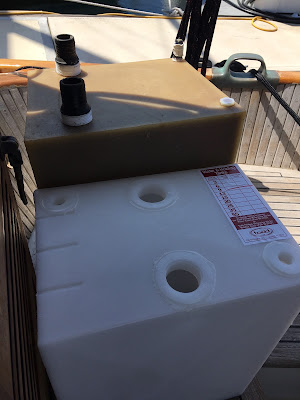
Old and tank side by side

My good friend who is my wive's uncle, Keni came by to help. With the old tank out we did test fits with the new tank.  Everything seemed to reach without having to add new hoses.  We pulled the tank out and went back to the cockpit to assembly everything. 

Keni brought along his electric drill and bit, so we could mark the location of the hole for the tank's gage.  A 1.25" diameter hole was drilled out in the top of the tank, then the flanges and plugs were added.  The new flanges had sharper rising spurs then the old tank did.  

Once the tank was back in it's spot, the new spurs made putting the hoses on a bit of a challenge.  Keni rose to the occasion, being much smaller then I jump onto the tank and pulled the hoses in.


Hoses on and double clamped onto the flanges, the next step was to install the tank level gage.  The gage has four self-tapping screws which secure it to the top of the tank.   Before mounting it we coated the bottom of it with a thin layer of 3M 5200 chalk it and the screw holes to prevent leakage as well as seal in the odors.

Tank Level Gage in Place
Once the gage was installed we connected the air hose, and installed the restrains.  I added lemon deodorizer to toilet and flushed it eight to ten times to fill the tank 1/2 way. Watching the hoses for the next two hours for leaks was the worst part - there were none.  Now sealed up, we're happy to say the cabin smells a lot better.